The calcite media has dust in it. Make sure to wear a paper mask or ensure proper ventilation to prevent inhaling the dust.
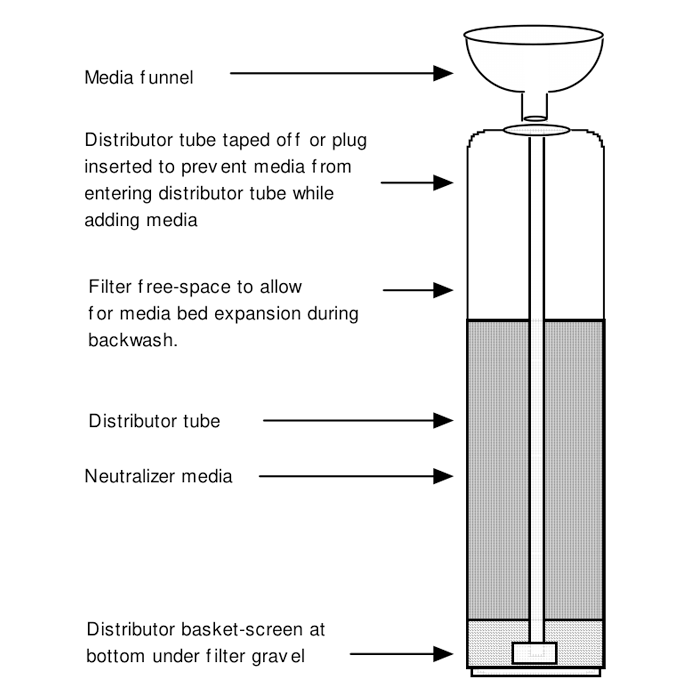
Adding Calcite in Top Plug Down-Flow Type Neutralizers
It has has a backwash control valve.
Remember to test the pH before and after using the neutralizer from time to time. If the pH is below 7.0, it’s acidic; ideally, it should be between 7.2 and 8.0 to stop pipes and fixtures from corroding. Every year or so, based on the pH readings, include additional calcite media to the neutralizer filter using these steps.
- 1. To begin, place the neutralizer filter on bypass or turn off the water pressure before the neutralizer.
- 2. Start a manual backwash cycle. With the system on bypass, this will release the pressure inside the control valve, allowing you to safely unscrew the Media Fill Plug situated on the top of the neutralizer tank. Disconnect the control valve cord from the wall outlet.
- 3. Use channel locks or pliers to unscrew the media fill plug. Use a tube or hose to siphon out 2 to 3 gallons of water from the filter tank. If you skip this step, water will flow out of the fill plug hole and onto the floor when you add the filter media. If having water on the floor is acceptable, you can skip the siphoning and directly pour the calcite media into the top fill plug hole.
- 4. Add the neutralizer filter media until the tank is about 2/3 full. Avoid overfilling; make sure there’s at least 12 inches of free space above the media to accommodate expansion during backwash.
- 5. Reconnect the control valve to the power, and gradually turn the bypass valve back to the service position. (When it’s in “service,” the system is set for filtering and neutralizing.) Allow the system to complete a full backwash and rinse cycle. Repeat the backwash cycle by initiating another manual cycle. This ensures thorough backwashing and rinsing of the neutralizer before putting it back into operation.
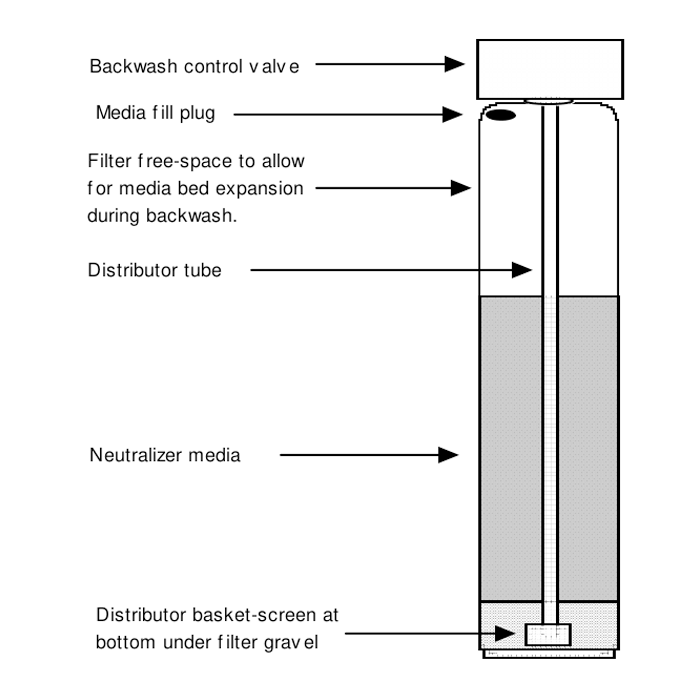
Adding Calcite in Down-Flow Type Neutralizers with No Top Fill Plug
- 1. To start, place the neutralizer filter on bypass or turn off the water pressure before the neutralizer.
- 2. Trigger a manual backwash cycle. As it’s on bypass, this will release the pressure within the control valve, allowing you to safely remove the backwash control valve located atop the neutralizer tank. Disconnect the control valve cord from the wall outlet.
- 3. After removing the control valve by unscrewing it, insert a small tube or hose into the distributor tube and siphon out a few gallons of water from the neutralizer. If you skip this step and directly add filter media, water might overflow from the top of the tank and spill onto the floor. If having water on the floor is acceptable, then you can skip siphoning water before pouring calcite media through the top fill plug hole.
- 4. Securely cover the top of the distributor tube with tape (black electrical tape works well) to prevent media from entering the distributor tube. Use a single piece of tape, leaving around 1/2″ of tape free for easy removal once media addition is complete.
- 5. Add neutralizer filter media until the tank is approximately 2/3 full. Avoid over-filling; ensure there’s at least 12″ of empty space above the media to allow for expansion during backwash.
- 6. Reattach the backwash control valve and plug the control valve cord back into the electrical outlet. Gradually turn the bypass valve back to the service position (if it’s in “service,” it’s set for filtering and neutralizing). Let the system complete a full backwash and rinse cycle. Repeat the backwash cycle by initiating another manual cycle, ensuring a thorough backwash and rinse before returning the neutralizer to service.
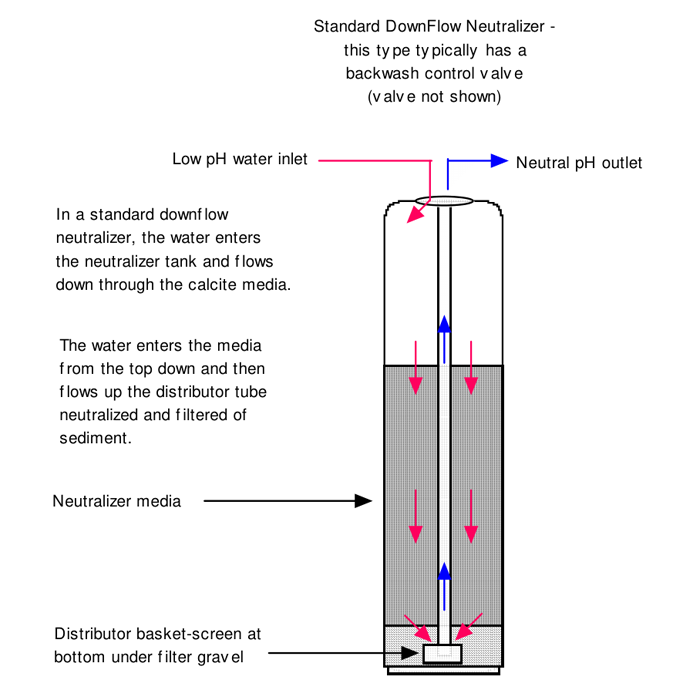
Understanding the Contrast Between Up-Flow and Down-Flow Calcite Neutralizers
Down-Flow neutralizers come with backwashing control valves:
In a typical downflow neutralizer, water enters the tank’s top and moves downward through the media, then upward through the distributor tube. This design clears out sediment and enables backwashing, a process that cleans and rearranges the calcite to prevent uneven flow. During backwash, the water direction reverses, moving downward through the distributor tube and upward through the media, lifting and expanding the calcite media. Throughout backwash, the flow of water works to purify the calcite.
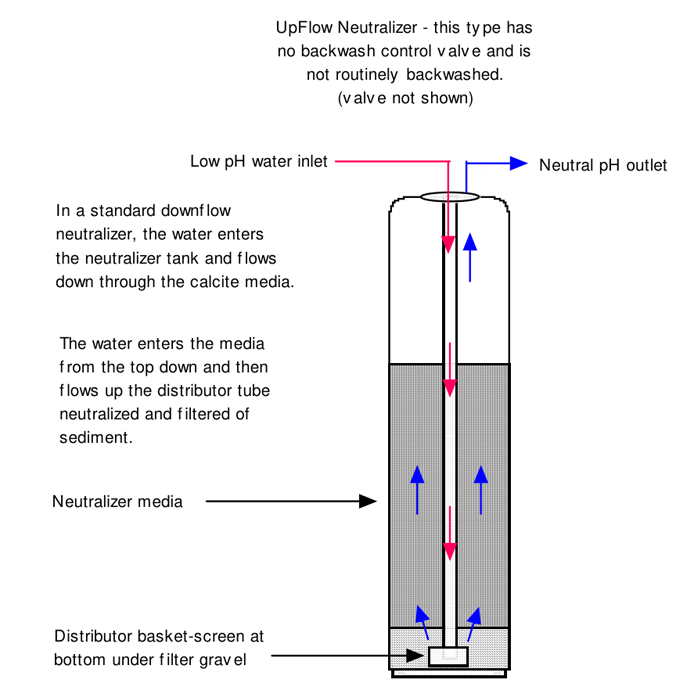
No Backwashing Control Valves Required for Up-Flow Neutralizers:
In the case of up-flow neutralizers, water consistently moves down the distributor tube and then upwards through the calcite media. Unlike other types, up-flow neutralizers don’t possess or require a backwash control valve. The absence of backwashing is due to the continuous upward flow through the calcite, eliminating the necessity for such a process. While this design suits certain scenarios and eliminates the need for a backwash drain link, it’s worth noting that up-flow variants can sometimes encounter issues related to channelling.
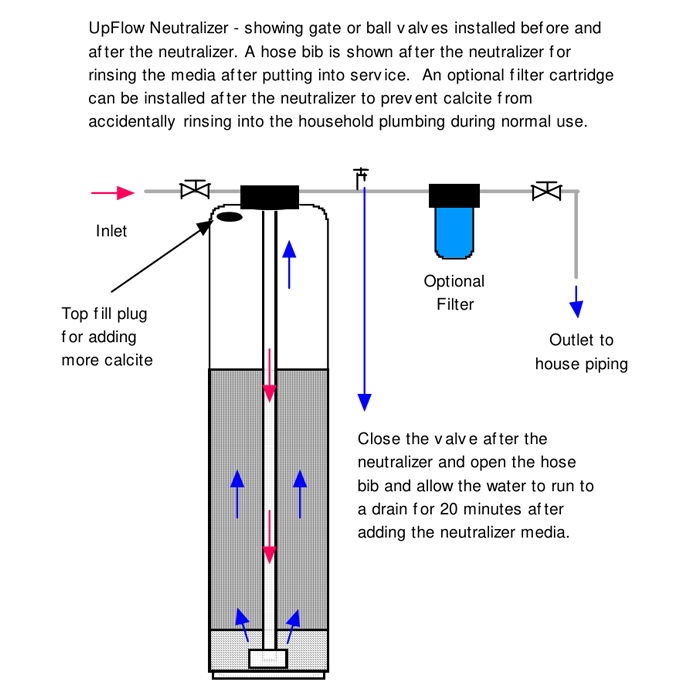
Including Calcite in Up-Flow Type Neutralizers – Whether With or Without a Top Fill Plug
- 1. To start, either put the neutralizer filter on bypass or turn off the water pressure before the neutralizer. Open a faucet or hose bib downstream of the neutralizer to release pressure in the neutralizer tank.
- 2. Use channel locks or pliers to unscrew the media fill plug. Use a tube or hose to siphon out 2 to 3 gallons of water from the filter tank. If you don’t do this, water will flow out of the fill plug hole and onto the floor when you add filter media. If water on the floor is acceptable, you can skip this step and directly pour calcite media into the top fill plug hole.
- 3. If there’s no top fill plug, unscrew the top tank manifold to access the tank and add calcite media.
- 4. Add neutralizer filter media until the tank is about 2/3 full. Don’t overfill; ensure there’s at least 12″ of free space above the media to allow for expansion during backwash.
- 5. Put back the top fill plug or tank manifold. Close the valve after the upflow neutralizer to stop water flow to the house. Open the hose bib after the neutralizer and gradually turn on the water to the neutralizer. Start with a slow flow for 10 minutes before switching to full force. Rinse the media thoroughly for 20 minutes before putting it into service, if possible.